Recommended Orienteering Compasses
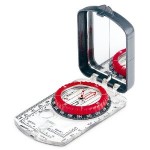
First, it is critical to get a “spinning dial” compass that is clear plastic, although it’s also nice to get one that allows you to “set declination” which is a fancy way of saying that it has prominent red lines/arrows that clearly shows your magnetic declination so that every time you use your compass, you don’t have to squint your eyes to find +16 degrees or whatever your local declination happens to be. Click on the NOAA website to find the declination for your area.
We also recommend getting a mirrored compass because it will help you find direction more accurately, and because a mirror can work as as signaling device in case you become lost or trapped. Click here for a sample of a basic orienteering compass, or here for the least expensive mirrored compass, or here for a more durable/accurate mirrored orienteering compass. or here for the classic Silva Ranger that is back on the market and hopefully as good as it was before the company changed hands a couple times!
Top Question We Get: Is there any reason I need a Global Compass if I’m only going to hike in North America? Actually, yes. As explained at The Compass Store the patented Suunto “global needle’s unique ability to handle tilts up to 20 degrees makes it perfect for hikers that don’t want to break their stride. Not having to level the compass exactly makes it easier to take an accurate reading while you’re still moving along the trail.” Of course, the patented design means twice the price, but worth it if you have cash to spare.
How To Use A Compass
Here’s the Conservation College, easy-for-all-ages, four-step process for using an orienteering compass: 
1. Spin the dial to put the direction/degree that you want to find, until that direction/degree is in the “12 o’clock” position aligned toward the PRINTED arrow. You are still completely ignoring the magnetic floating needle.
2. Hold the compass FLAT out in front of you with the PRINTED arrow pointed AWAY from you, and make sure your cell phone and other things with a magnetic pull are not next to the compass.
3. Still holding the compass correctly, turn YOURSELF around SLOWLY until the red side of the floating magnetic needle points toward magnetic north, which in washington is about 16 degrees.
4. LOOK UP and choose a far-off object that is DIRECTLY in line with the PRINTED ARROW on top of your compass (not the red magnetic needle which always points toward magnetic north, so don’t follow that unless you really want to walk toward magnetic north:) and PUT AWAY YOUR COMPASS and THEN walk toward the object you’ve chosen in the correct direction.
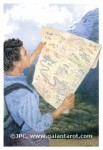
How To Use A Compass With Map
For advanced students who want to put compass to map, moving from Point A to Point B, here’s the Wolf College four-step process for that:
1. Spin compass dial so that NORTH is at the 12 O’CLOCK POSITION.
2. Place the exact center of the compass over Point A (the exact spot on the map where you are starting from) and so that the top of the compass is ALIGNED with NORTH on the map.
3. Take a string or straight-edge, and draw/extend a straight line between the exact center of the compass and Point B where you want to go. NOTE THE DEGREE READING over which the line/string is positioned.
4. Put away the map. Spin the dial on your compass so that your noted DEGREE READING IS AT THE 12 O’CLOCK POSITION. Holding your compass correctly out in front of you, turn yourself slowly around until the red magnetic needle is at your declination point (16 degrees). Look up and choose an object to walk toward in that direction, and then walk in that direction until you get to Point B. Of course, you have to know how far away your destination is, or how much time it should take to get to your destination, or use your map to notice landmarks along the way, so that you can stop at the correct spot:)
Chris Chisholm is founder and co-owner of Wolf Camp and the Conservation College. Next, go to the Top 10 List of Natural Navigation, Lostproofing & Orienteering Tips, Tricks & Advice then check out the excellent and practical https://www.mountaineers.org/blog/the-frugal-navigator by John Godino, Navigation Instructor with the Mazamas.
For wilderness survival training including navigation/lostprooring/orienteering, check out these great courses:
Spring Workshops: Saturday Backcountry Navigation & Leadership in Western Washington with the Conservation College.
July Expedition: Five Day Wilderness Survival Training & Trek in Western Washington with the Conservation College.


