Making traditional fire by friction, or “rubbing two sticks together” is real, and it’s more than a fun project: it’s also the most reliable way to start a fire once you learn how. How can an ancient way of starting fire be the most reliable if it is difficult? Well, it’s only difficult if you haven’t learned how. Once you learn, then it becomes the most reliable method because the coal you create is durable in cold, rainy, and windy conditions. Further, you can’t “run out” of fire lighting material if you know how to make traditional fire by friction. Once you use up your matches, lighter, fire steel, or other ignition source, you need to know traditional fire by friction.
There are also another couple dozen known methods of starting traditional fire by friction, but I highly recommend the bow-drill method of fire-by-friction for everyone in cold climates. I have seen archeological evidence of its use throughout the northern latitudes, and it seems to be the best technology for cold, wet climates where wood with high combustion temperatures dominate the landscape. But it is a waste of time to learn this method if you can’t light a fire with manufactured materials, nor keep a fire going once you’ve created a coal using friction. So go to my previous blog post and review the best way to make and maintain fire before you continue here.
Correct Bow Drill Form, Tips, Tricks, Pitfalls & Advice
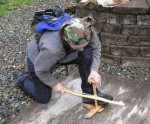
Most important with bow drilling in general, is to develop excellent form. Big guys can power through bad form under good weather conditions, but bad form gets even them in trouble when weather and wood conditions are poor. So, watch the video, and note the most important things you’ll have to remember, including:
- Carve an artistic-looking kit, because the more artistic it looks, the more perfect it is, and the less perfect is, the harder it will be to start your fire.
- Don’t use a bowed bow; find a fairly straight stick because if you put the spindle into the rope correctly, it will ride on the outside of the rope, so your bow doesn’t need to be bent much. Besides, if your bow is bent too much, you won’t be able to hold your spindle in the rope while holding your bow all with the same hand – something that will free your other hand up to arrange other things and grab your hand-hold.
- Raise your kit off the ground using pieces of bark and other insulation, because the ground will cool your kit and kill your coal.
- Check out the picture of the bow drill kit below to view an easy way to tie your rope onto your bow, and make your rope as taut as you can. If you can get your spindle into the rope easily, it’s nowhere near tight enough.
- Speaking of getting the spindle into the rope, just jam your bow into your belly, start the spindle into the rope, then let go of the bow and crab both ends of the spindle to crank it into the rope. Then hold the spindle in the rope bow all with the same hand in order to free your other hand up to grab your hand-hold.
- Position yourself so that your body blocks the wind.
- Turn your bow around if necessary to position the correct end of the spindle onto the hearth, and so that the top side of the spindle is the one you want to keep lubricated for your hand-hold.
- Speaking of lubricating the hand-hold, don’t use oils for that because oils will burn off when hot. The best are pine-family needles, especially fir tree needles. They work like a charm.

- Position the foot you put on the hearth (bottom board) perfectly, so that your arm holding the “hand-hold” is firmly locked into your shin. For big people who can’t get their arm around the outside of their leg, try putting firmly up against the inside of your leg.
- Raise yourself up as straight as you can, so that your arm is as straight as possible, because if you lean over and bend your arm, you’re going to need a lot of strength to push down, whereas if your arm is straight, the body weight you put on your arm will be all you need.
- Hold your bow at the very end, covering the area where the rope is tied on, whereas if you hold it toward the middle, it will be super wobbly.
- Take care to hold your hand-hold flat. It may feel like it’s flat, but have an outside observer look from the side and re-position your hand so that it’s flat.
- Start with little pressure to get going, then push down to create dust until the dust fills your 1/8 pie notch, described in the next section. Once the dust touches the bottom of your spindle, take a break to breathe, but always keeping the spindle in position so that it stays hot, then go for it with less pressure and more speed.
- This is where most people create a coal but don’t think they did. If you have black dust, you created a coal, but it went out. To keep it from going out, a delicate balance between air and shelter must be maintained, so just barely “tilt” the spindle out of the notch so that air can get to the dust, but not so much that you cool the dust down too quickly. I like to keep the spindle tilted in the notch and blow air toward the dust.
- Carefully transfer your coal with a knife into your ready tinder, so that the coal stays together. Blow it into flame, holding the tinder above face level so that the smoke goes away from you, and again, it is a delicate balance between air and fuel. Cup the tinder so that the coal gets constant new fuel, but constantly blow into it from about 8 inches away (reduces breathy water vapor if you aren’t too close) until it flames up.
Beginner Bow Drill Skills: Start With A Pre-Fab Kit

Chris Chisholm with a display of Bow Drill Kit Pieces: Splitting a 12″ piece of Cedar Decking with his Mora Knife to make a spindle blank and bottom board hearth; two finished cylindrical spindles; three bottom board hearths that have been drilled at least once each; two hand holds made from 2×3 green fir; jute cordage with pieces unspun at various stages, resting on an old piece of cedar fencing with pine pitch glob that burns like a candle; and 5 sizes of bows with synthetic string, including one he’s using to bonk his knife.
I highly recommend making your first bow drill kit with materials purchased form a lumber store so that you can concentrate on learning good form before progressing to making fire from all-natural materials. We have the following pre-fab kits available for sale at events, classes and workshops, but we don’t ship items, so to make your own, follow these directions:
- For Your Hearth: Buy one dry piece of 1/2 inch cedar fencing, and cut a foot-long piece for your hearth. You will be able to make multiple drilling notches, and I recommend the 1/2 inch because for your first fire, you won’t have to drill very far to build up dust in the notch you make.
- For Your Spindle: Buy one dry piece of cedar decking which is usually 3/4 inches thick by 3 inches wide. Cut it off a one-foot length, and you should be able to split that into 3 spindle blanks. Carve the best looking spindle blank into a perfect cylinder, then carve both ends into points.
- For Your Hand-Hold: Buy one green piece of 2×3 green douglas fir, and cut a piece to fit your hand, usually about 3.5-4.0 inches long. Drill a hole half-way through the very center, and carve it into a smooth, conical shape.
- For Your Bow: Find the lightest stick you can’t easily break, and cut it to be as long as your arm from armpit-to-palm. Smooth off any bumps that would get in the way of the rope or your hand.
- For Your String: Buy some 1/4 inch diamond-braided nylon rope.
- For Your Tinder: Buy some jute string which any lumber or hardware store should have. Jute is a natural plant fiber that is known for making burlap sacks, and it is highly flammable. Cut about 20-30, four-inch (10 cm) pieces of the jute, and unspin them into individual strands, and then unspin those so that you can see the original plant fibers. Separate those fibers and fluff them up to create a big bird-nest-looking tinder bundle. There are a hundred other things you can use as tinder, and the best natural mix is something that flames up well (like dead grass or many inner barks) blended with a “coal extender” that doesn’t flame well but keeps your coal alive, like “downy” material such as cattail down, cottonwood seed, thistle down and other wind-dispersed flowering plant seeds.
- For Your Knee-Plate, Coal Catch Plate & Tinder: Find pieces of soft bark you can use to raise your hearth off the ground, as a coal catch-plate, and also to put under your back knee when you are drilling. If you have a dry piece of plywood, put everything, including yourself, on it.
Now that you have all your materials, it’s time to start drilling:
- Press your pointed spindle into your hearth so that when you drill down later, the edge of the spindle will be 1 cm from the edge of your hearth.
- Put your spindle into your bow string, and start drilling, but stop when it starts smoking.
- Put your bow and spindle aside, and carve a perfect 1/8 pie notch from the edge of your hearth into the center of your notch; well, about 1 mm from the center of your notch so that you don’t accidentally go too far.
- Put a sprig of pine/fir needles into your conical hand-hold notch.
- Go for it.
Intermediate Bow Drill Skills: Carving Your Kit From Nature
While you are practicing your form on your pre-cut kit, I recommend gathering and drying materials from nature in order to make your own all-natural kit.
- For Your Hearth: There are infinite options for good hearth wood. Score your chosen wood to size, and split it to the correct, flat thickness. The harder your wood, the thinner your hearth can be.
- For Your Spindle: Take the remnants of your hearth-wood and carve it into a functional spindle. The harder the wood, the thinner your spindle should be.
- For Your Hand-Hold: Choose a rock that naturally fits your hand, and find a harder rock to peck a hole into the exact center of it. Wear eye and ear protection. If you have a saw, you can grab any hard, green wood and cut it to size to use as a wooden hand-hold.
- For Your Bow & String: Same as above.
- For Your Knee-Plate, Coal Catch Plate & Tinder: Same as above.
- For Coal Extender: Same as above.
Advanced Bow Drill Skills: Breaking Rock & Using Natural Cordage
Making a bow-drill kit is a challenge without a good carving tool, and without strong cordage. So you need to know where to find these things, how to “break rock” in a way that works as well as knives to carve, score and split wood. You will also need to know how to find the strongest and most pliable plant fibers for making your string. For instance, you can pull conifer roots, harvest willow bark, or cut vine maple branches for cordage. Finally, you will need a bendable, springy bow, because when you put your spindle into your natural rope, the rope will break under too much pressure; when the bow is allowed to release to it’s preferred shape, the tension on your natural string should be just about perfect.
Chris Chisholm is founder and co-owner of Wolf Camp & School of Natural Science. For excellent wilderness survival training including traditional fire making with Chris as lead instructor, check out these great courses:
Weekly Online Classes:
- Tuesday Classes focus on Herbal Medicine & Plant Crafts in the autumn season, followed by Gardening & Cooking Wild Edible Food Plants in the spring.
- Thursday Classes focus on Wilderness Survival & Bushcraft Skills in the Autumn Season, followed by Wildlife Tracking & Birding in the spring.
- Saturday Classes for all ages guide you through the Wolf Journey Earth Conservation Course – Book One: The Neighborhood Naturalist.


